With Zig Programming Language, we have a fun new way to create Embedded Applications for Apache NuttX RTOS.
Today we shall write a Zig program that reads a NuttX Sensor: Bosch BME280 Sensor for Temperature, Humidity and Air Pressure.
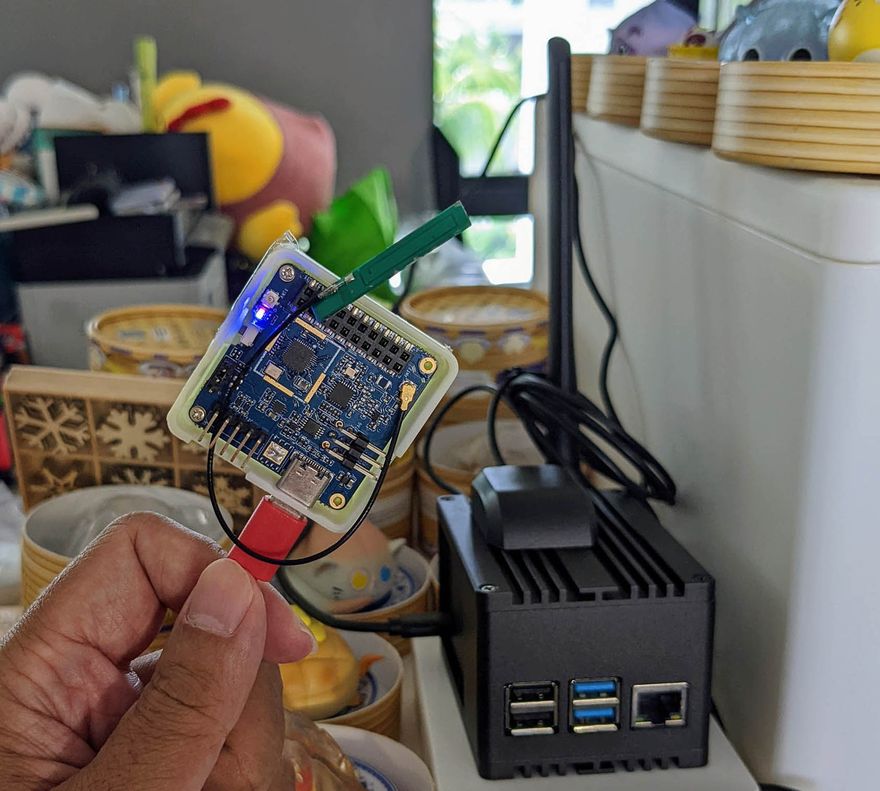
And we'll run it on Pine64's PineCone BL602 RISC-V Board. (Pic above)
(The steps will be similar for other sensors and microcontrollers)
Why are we doing this in Zig?
Zig is super helpful for writing safer programs because it catches problems at runtime: Overflow, Underflow, Array Out-of-Bounds and more. (See the list)
The code we see today will be useful for programming IoT Gadgets with Zig. We'll use the code in upcoming projects for LoRaWAN and Visual Programming. (Details below)
What if we're not familiar with Zig?
This article assumes that we're familiar with C. The Zig-ish parts shall be explained with examples in C.
But really... What if we prefer to do this in C?
NuttX already provides an excellent Sensor Test App in C...
That inspired the Zig program in this article...
Let's dive in and find out how we read NuttX Sensors with Zig!
Note: The NuttX Sensor API is going through some breaking changes as of Jul 2022. We'll update the article when the API settles down.
Bosch BME280 Sensor
For today we'll call this NuttX Driver for Bosch BME280 Sensor...
The BME280 Driver exposes two NuttX Sensor Devices...
-
Barometer Sensor: /dev/sensor/baro0
(For Temperature and Air Pressure)
-
Humidity Sensor: /dev/sensor/humi0
(For Humidity)
We shall read both Sensor Devices to fetch the Sensor Data for Temperature, Air Pressue and Humidity.
Read Barometer Sensor
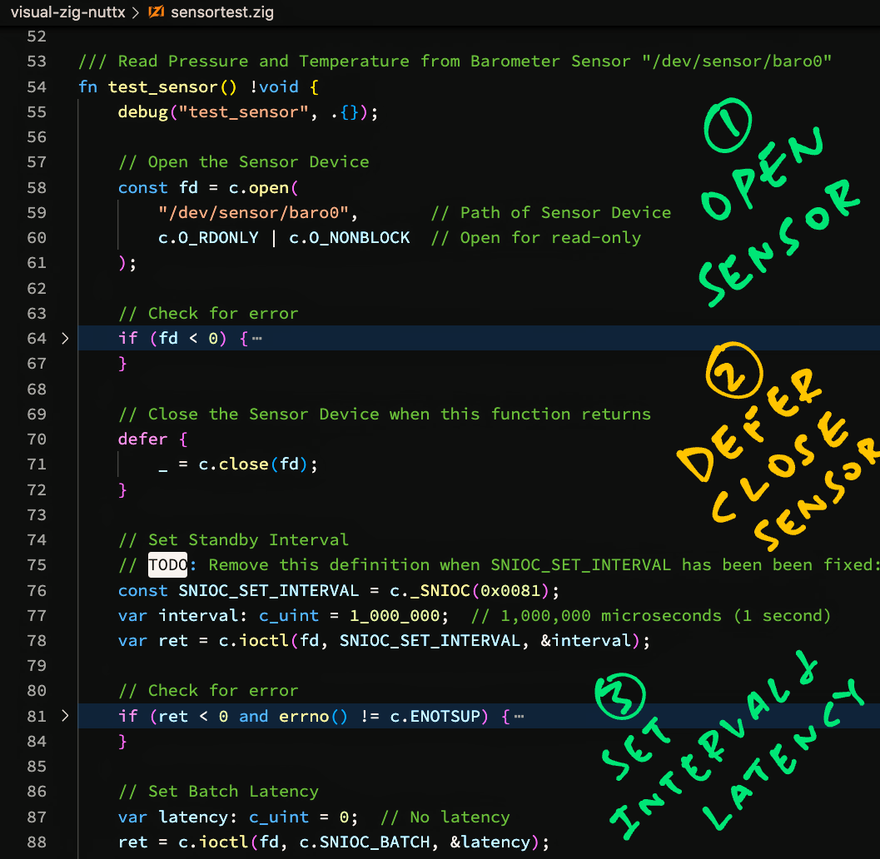
Let's walk through the code to read the Temperature and Air Pressure from our NuttX Barometer Sensor at "/dev/sensor/baro0"...
Open Sensor Device
Set Standby Interval
Set Batch Latency
Enable Sensor
Poll Sensor
Read Sensor Data
Print Sensor Data
Disable Sensor
Close Sensor Device
Open Sensor Device
We begin by opening the Sensor Device: sensortest.zig
/// Read Pressure and Temperature from
/// Barometer Sensor "/dev/sensor/baro0"
fn test_sensor() !void {

  // Open the Sensor Device
  const fd = c.open(
    "/dev/sensor/baro0",       // Path of Sensor Device
    c.O_RDONLY | c.O_NONBLOCK  // Open for read-only
  );
open() should look familiar... On Linux we open Devices the same way.
What's "!void"?
That's the Return Type of our function...
-
Our function doesn't return any value
(Hence "
void") -
But it might return an Error
(Hence the "
!")
Why the "c." prefix?
We write "c.something" for Functions, Types and Macros imported from C.
(More about this in a while)
Next we check if the Sensor Device has been successfully opened...
  // Check for error
  if (fd < 0) {
    std.log.err(
      "Failed to open device:{s}",
      .{ c.strerror(errno()) }
    );
    return error.OpenError;
  }
If the Sensor Device doesn't exist, we print a Formatted Message to the Error Log and return an Error.
What's "{s}"?
That's for printing a Formatted String in Zig.
It's equivalent to "%s" in C...
printf("Failed to open device:%s", strerror(errno()));
What's ".{ ... }"?
That's how we pass a list of Arguments when printing a Formatted Message.
If we have no Arguments, we write ".{}"
(".{ ... }" creates an Anonymous Struct)
Close Sensor Device (Deferred)
We've just opened the Sensor Device and we must close it later...
But the Control Flow gets complicated because we might need to handle Errors and quit early. In C we'd code this with "goto".
For Zig we do this nifty trick...
  // Close the Sensor Device when
  // this function returns
  defer {
    _ = c.close(fd);
  }
When we write "defer", this chunk of code will be executed when our function returns.
This brilliantly solves our headache of closing the Sensor Device when we hit Errors later.
Why the "` =` something"?_
Zig Compiler stops us if we forget to use the Return Value of a Function.
We write "_ = something" to tell Zig Compiler that we're not using the Return Value.
Set Standby Interval
Some sensors (like BME280) will automatically measure Sensor Data at Periodic Intervals. (Like this)
Let's assume that our sensor will measure Sensor Data every 1 second...
  // TODO: Remove this definition when
  // SNIOC_SET_INTERVAL has been been fixed:
  // https://github.com/apache/incubator-nuttx/issues/6642
  const SNIOC_SET_INTERVAL = c._SNIOC(0x0081);

  // Set Standby Interval
  var interval: c_uint = 1_000_000;  // 1,000,000 microseconds (1 second)
  var ret = c.ioctl(
    fd,                  // Sensor Device
    SNIOC_SET_INTERVAL,  // ioctl Command
    &interval            // Standby Interval
  );
(c_uint is equivalent to "unsigned int" in C)
In case of error, we quit...
  // Check for error
  if (ret < 0 and errno() != c.ENOTSUP) {
    std.log.err("Failed to set interval:{s}", .{ c.strerror(errno()) });
    return error.IntervalError;
  }
(IntervalError is defined here)
Which also closes the Sensor Device. (Due to our earlier "defer")
Set Batch Latency
We set the Batch Latency, if it's needed by our sensor...
  // Set Batch Latency
  var latency: c_uint = 0;  // No latency
  ret = c.ioctl(
    fd,             // Sensor Device
    c.SNIOC_BATCH,  // ioctl Command
    &latency        // Batch Latency
  );
And we check for error...
  // Check for error
  if (ret < 0 and errno() != c.ENOTSUP) {
    std.log.err("Failed to batch:{s}", .{ c.strerror(errno()) });
    return error.BatchError;
  }
Enable Sensor
This is how we enable our sensor before reading Sensor Data...
  // Enable Sensor and switch to Normal Power Mode
  ret = c.ioctl(
    fd,                // Sensor Device
    c.SNIOC_ACTIVATE,  // ioctl Command
    @as(c_int, 1)      // Enable Sensor
  );

  // Check for error
  if (ret < 0 and errno() != c.ENOTSUP) {
    std.log.err("Failed to enable sensor:{s}", .{ c.strerror(errno()) });
    return error.EnableError;
  }
Why the "@as(c_int, 1)"?
As we've seen, Zig can infer the types of our variables and constants. (So we don't need to specify the types ourselves)
But ioctl() is declared in C as...
int ioctl(int fd, int req, ...);
Note that the Third Parameter doesn't specify a type and Zig Compiler gets stumped.
That's why in Zig we write the Third Parameter as...
@as(c_int, 1)
Which means that we pass the value 1 as a C Integer Type.
Poll Sensor
After the enabling the sensor, we poll the sensor to check if Sensor Data is available...
  // Prepare to poll Sensor
  var fds = std.mem.zeroes(
    c.struct_pollfd
  );
  fds.fd = fd;
  fds.events = c.POLLIN;
std.mem.zeroes creates a pollfd Struct that's initialised with nulls.
(The struct lives on the stack)
After populating the struct, we poll it...
  // If Sensor Data is available...
  if (c.poll(&fds, 1, -1) > 0) {

    // Coming up: Read Sensor Data...
We're finally ready to read the Sensor Data!
Read Sensor Data
We allocate a buffer (on the stack) to receive the Sensor Data...
    // Define the Sensor Data Type
    var sensor_data = std.mem.zeroes(
      c.struct_sensor_event_baro
    );
    // Size of the Sensor Data
    const len = @sizeOf(
      @TypeOf(sensor_data)
    );
std.mem.zeroes returns a sensor_event_baro Struct, initialised with nulls.
We read the Sensor Data into the struct...
    // Read the Sensor Data
    if (c.read(fd, &sensor_data, len) >= len) {

      // Convert the Sensor Data
      // to Fixed-Point Numbers
      const pressure = float_to_fixed(
        sensor_data.pressure
      );
      const temperature = float_to_fixed(
        sensor_data.temperature
      );
(float_to_fixed is explained here)
And convert the Pressure and Temperature from Floating-Point to Fixed-Point Numbers.
Which are similar to Floating-Point Numbers, but truncated to 2 Decimal Places.
(Why we use Fixed-Point Numbers)
Print Sensor Data
Now we have the Pressure and Temperature as Fixed-Point Numbers, let's print the Sensor Data...
      // Print the Sensor Data
      debug("pressure:{}.{:0>2}", .{
        pressure.int,
        pressure.frac
      });
      debug("temperature:{}.{:0>2}", .{
        temperature.int,
        temperature.frac
      });

      // Will be printed as...
      // pressure:1007.66
      // temperature:27.70
What are "int" and "frac"?
Our Fixed-Point Number has two Integer components...
int: The Integer part
frac: The Fraction part, scaled by 100
So to represent 123.45, we break it down as...
int =
123frac =
45
Why print the numbers as "{}.{:0>2}"?
Our Format String "{}.{:0>2}" says...
{} |
Print int as a number |
. |
Print .
|
{:0>2} |
Print frac as a 2-digit number, padded at the left by 0
|
Which gives us the printed output 123.45
In case we can't read the Sensor Data, we write to the Error Log...
    } else { std.log.err("Sensor data incorrect size", .{}); }
  } else { std.log.err("Sensor data not available", .{}); }
Disable Sensor
We finish by disabling the sensor...
  // Disable Sensor and switch to Low Power Mode
  ret = c.ioctl(
    fd,                // Sensor Device
    c.SNIOC_ACTIVATE,  // ioctl Command
    @as(c_int, 0)      // Disable Sensor
  );

  // Check for error
  if (ret < 0) {
    std.log.err("Failed to disable sensor:{s}", .{ c.strerror(errno()) });
    return error.DisableError;
  }
}
And we're done reading the Temperature and Pressure from the NuttX Barometer Sensor!
Have we forgotten to close the sensor?
Remember earlier we did this...
  // Close the Sensor Device when
  // this function returns
  defer {
    _ = c.close(fd);
  }
This closes the sensor automagically when we return from the function. Super handy!

Read Humidity Sensor
What about the Humidity from our BME280 Sensor?
We read the Humidity Sensor Data the exact same way as above, with a few tweaks: sensortest.zig
/// Read Humidity from Humidity Sensor
/// "/dev/sensor/humi0"
fn test_sensor2() !void {

  // Open the Sensor Device
  const fd = c.open(
    "/dev/sensor/humi0",       // Path of Sensor Device
    c.O_RDONLY | c.O_NONBLOCK  // Open for read-only
  );
In the code above we changed the path of the Sensor Device.
The Sensor Data Struct becomes sensor_event_humi...
  // If Sensor Data is available...
  if (c.poll(&fds, 1, -1) > 0) {

    // Define the Sensor Data Type
    var sensor_data = std.mem.zeroes(
      c.struct_sensor_event_humi
    );
    // Size of the Sensor Data
    const len = @sizeOf(
      @TypeOf(sensor_data)
    );
Which contains a single value for the Humidity Sensor Data...
    // Read the Sensor Data
    if (c.read(fd, &sensor_data, len) >= len) {

      // Convert the Sensor Data
      // to Fixed-Point Number
      const humidity = float_to_fixed(
        sensor_data.humidity
      );

      // Print the Sensor Data
      debug("humidity:{}.{:0>2}", .{
        humidity.int,
        humidity.frac
      });

      // Will be printed as...
      // humidity:78.81
And we're done!
Where's the list of Sensor Data Structs?
The NuttX Sensor Data Structs are defined at...
What about the Sensor Device Names like baro0 and humi0?
Here's the list of NuttX Sensor Device Names...
How are test_sensor and test_sensor2 called?
They are called by our Zig Main Function.
(More about this in a while)

Import NuttX Functions
How do we import into Zig the NuttX Functions? open(), ioctl(), read(), ...
This is how we import the NuttX Functions, Types and Macros from C into Zig: sensor.zig
/// Import the Sensor Library from C
pub const c = @cImport({
  // NuttX Defines
  @cDefine("__NuttX__",  "");
  @cDefine("NDEBUG",     "");
  @cDefine("ARCH_RISCV", "");

  // This is equivalent to...
  // #define __NuttX__
  // #define NDEBUG
  // #define ARCH_RISCV
At the top we set the #define Macros that will be referenced by the NuttX Header Files coming up.
The settings above are specific to NuttX for BL602. (Because of the GCC Options)
Next comes a workaround for a C Macro Error that appears on Zig with NuttX...
  // Workaround for "Unable to translate macro: undefined identifier `LL`"
  @cDefine("LL", "");
  @cDefine("__int_c_join(a, b)", "a");  //  Bypass zig/lib/include/stdint.h
Then we import the C Header Files for NuttX...
  // NuttX Header Files. This is equivalent to...
  // #include "...";
  @cInclude("arch/types.h");
  @cInclude("../../nuttx/include/limits.h");
  @cInclude("nuttx/sensors/sensor.h");
  @cInclude("nuttx/config.h");
  @cInclude("sys/ioctl.h");
  @cInclude("inttypes.h");
  @cInclude("unistd.h");
  @cInclude("stdlib.h");
  @cInclude("stdio.h");
  @cInclude("fcntl.h");
  @cInclude("poll.h");
});
"types.h" and "limits.h" are needed for NuttX compatibility. (See this)
The other includes were copied from the NuttX Sensor Test App in C: sensortest.c
What about NuttX Structs like sensor_event_baro and sensor_event_humi?
NuttX Structs will be automatically imported with the code above.
NuttX Macros like O_RDONLY and SNIOC_BATCH will get imported too.
Why do we write "c.something" when we call NuttX functions? Like "c.open()"?
Remember that we import all NuttX Functions, Types and Macros into the "c" Namespace...
/// Import Functions, Types and Macros into "c" Namespace
pub const c = @cImport({ ... });
That's why we write "c.something" when we refer to NuttX Functions, Types and Macros.
Main Function
One more thing before we run our Zig program: The Main Function.
We begin by importing the Zig Standard Library and NuttX Sensor Definitions: sensortest.zig
/// Import the Zig Standard Library
const std = @import("std");

/// Import the NuttX Sensor Definitions
const sen = @import("./sensor.zig");

/// Import the NuttX Sensor Library
const c = sen.c;

/// Import the Multi-Sensor Module
const multi = @import("./multisensor.zig");
sen.c refers to the C Namespace that contains the Functions, Types and Macros imported from NuttX.
(We'll talk about the Multi-Sensor Module in a while)
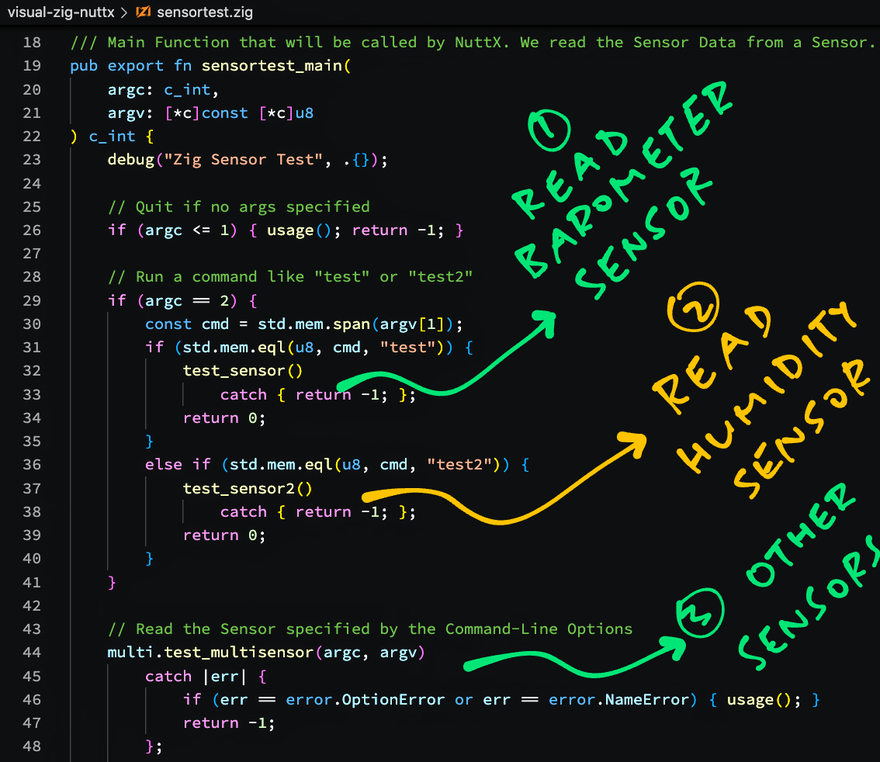
Next we declare our Main Function that will be called by NuttX...
/// Main Function that will be called by NuttX.
/// We read the Sensor Data from a Sensor.
pub export fn sensortest_main(
    argc: c_int,
    argv: [*c]const [*c]u8
) c_int {

  // Quit if no args specified
  if (argc <= 1) { usage(); return -1; }
Why is argv declared as "[*c]const [*c]u8"?
That's because...
-
"[*c]u8" is a C Pointer to an Unknown Number of Unsigned Bytes
(Like "uint8_t *" in C)
-
"[*c]const [*c]u8" is a C Pointer to an Unknown Number of the above C Pointers
(Like "uint8_t *[]" in C)
So it's roughly equivalent to "char **argv" in C.
(More about C Pointers in Zig)
We check the Command-Line Argument passed to our program...
  // Run a command like "test" or "test2"
  if (argc == 2) {

    // Convert the command to a Slice
    const cmd = std.mem.span(argv[1]);
Assume that "argv[1]" points to "test", the command-line arg for our program.
std.mem.span converts "test" to a Zig Slice.
Let's pretend a Slice works like a "String", we'll explain in the next section.
This is how we compare our Slice with a String (that's actually another Slice)...
    // If the Slice is "test"...
    if (std.mem.eql(u8, cmd, "test")) {

      // Read the Barometer Sensor
      test_sensor()
        catch { return -1; };
      return 0;
    }
So if the command-line arg is "test", we call test_sensor to read the Barometer Sensor. (As seen earlier)
If test_sensor returns an Error, the catch clause says that we quit.
And if the command-line arg is "test2"...
    // If the Slice is "test2"...
    else if (std.mem.eql(u8, cmd, "test2")) {

      // Read the Humidity Sensor
      test_sensor2()
        catch { return -1; };
      return 0;
    }
  }
We call test_sensor2 to read the Humidity Sensor. (As seen earlier)
For other command-line args we run a Multi-Sensor Test...
  // Read the Sensor specified by the Command-Line Options
  multi.test_multisensor(argc, argv)
    catch |err| {

      // Handle the error
      if (err == error.OptionError or err == error.NameError) { usage(); }
      return -1;
    };

  return 0;
}
(We'll talk about Multi-Sensor Test in a while)
That's all for our Main Function!
What's "|err|"?
If our function test_multisensor fails with an Error...
  multi.test_multisensor(argc, argv)
    catch |err| {
      // Do something with err
    }
Then err will be set to the Error returned by test_multisensor.
Slice vs String
Why do we need Slices? The usual Strings are perfectly splendid right?
Strings in C (like argv[1] from the previous section) are represented like this...
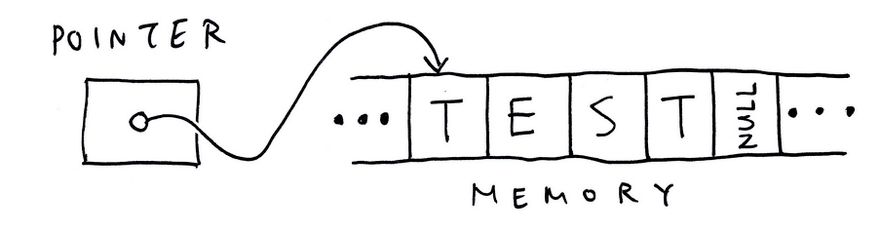
That's a Pointer to an Array of characters, terminated by Null.
What if we make a mistake and overwrite the Terminating Null?
Disaster Ensues! Our String would overrun the Array and cause Undefined Behaviour when we read the String!
That's why we have Slices, a safer way to represent Strings (and other buffers with dynamic sizes)...
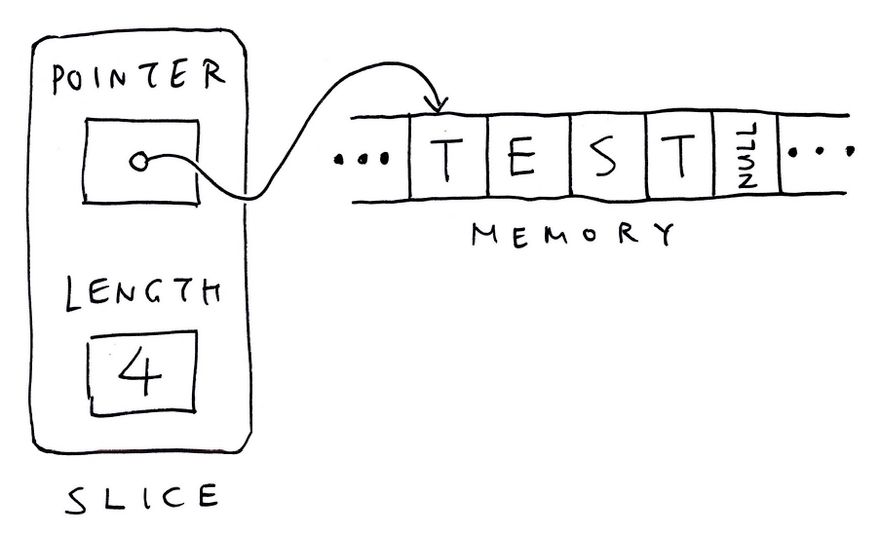
A Slice has two components...
Pointer to an Array of characters (or another type)
Length of the Array (excluding the null)
Because Slices are restricted by Length, it's a little harder to overrun our Strings by accident.
(If we access the bytes beyond the bounds of the Slice, our program halts with a Runtime Panic)
To convert a Null-Terminated String to a Slice, we call std.mem.span...
// Convert the command-line arg to a Slice
const slice = std.mem.span(argv[1]);
And to compare two Slices, we call std.mem.eql...
// If the Slice is "test"...
if (std.mem.eql(u8, slice, "test")) {
  ...
}
u8 (unsigned byte) refers to the type of data in the Slice.
To convert a Slice back to a C Pointer, we write &slice[0]...
// Pass the Slice as a C Pointer
const fd = c.open(
  &slice[0],
  c.O_RDONLY | c.O_NONBLOCK
);
// Slice must be null-terminated.
// Triggers a runtime panic if the Slice is empty.
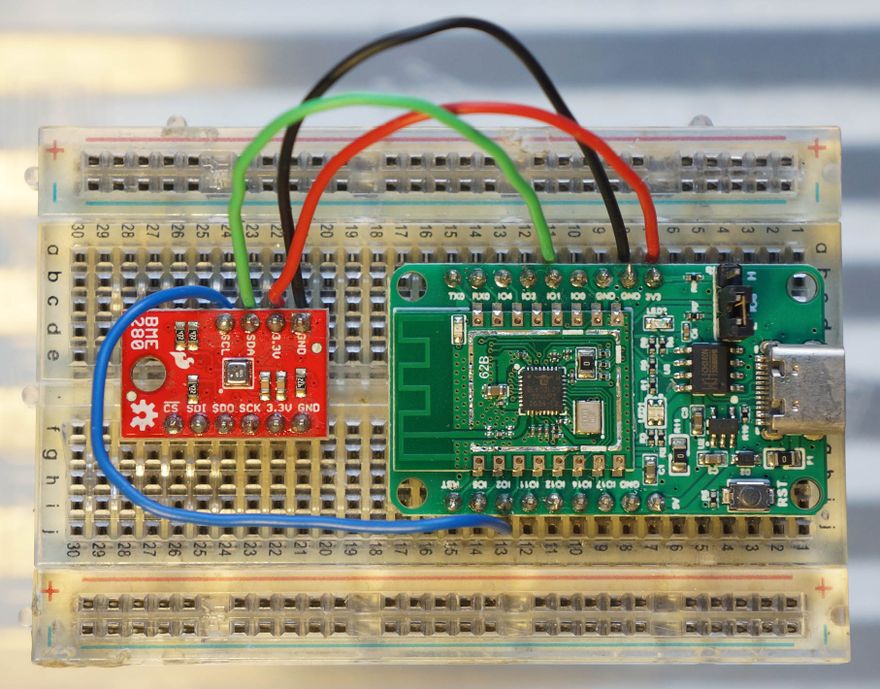
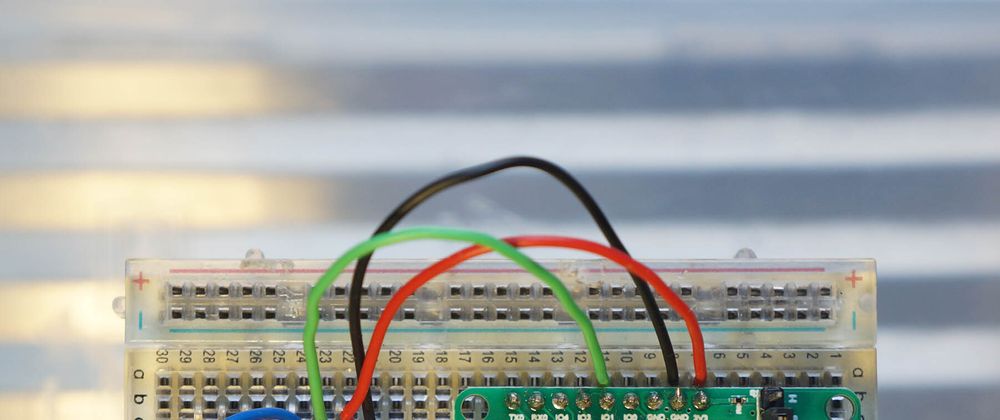
Connect BME280 Sensor
For testing the Zig Sensor App, we connect the BME280 Sensor (I2C) to Pine64's PineCone BL602 Board (pic above)...
| BL602 Pin | BME280 Pin | Wire Colour |
|---|---|---|
GPIO 1 |
SDA |
Green |
GPIO 2 |
SCL |
Blue |
3V3 |
3.3V |
Red |
GND |
GND |
Black |
The I2C Pins on BL602 are defined here: board.h
/* I2C Configuration */
#define BOARD_I2C_SCL \
  (GPIO_INPUT | GPIO_PULLUP | GPIO_FUNC_I2C | \
  GPIO_PIN2)
#define BOARD_I2C_SDA \
  (GPIO_INPUT | GPIO_PULLUP | GPIO_FUNC_I2C | \
  GPIO_PIN1)
(Which pins can be used? See this)
Compile Zig App
Below are the steps to compile our Zig Sensor App for Apache NuttX RTOS and BL602 RISC-V SoC.
First we download the latest version of Zig Compiler (0.10.0 or later), extract it and add to PATH...
Then we download and compile Apache NuttX RTOS for BL602...
Check that the following have been enabled in the NuttX Build...
After building NuttX, we download and compile our Zig Sensor App...
##  Download our Zig Sensor App for NuttX
git clone --recursive https://github.com/lupyuen/visual-zig-nuttx
cd visual-zig-nuttx

##  Compile the Zig App for BL602
##  (RV32IMACF with Hardware Floating-Point)
##  TODO: Change "$HOME/nuttx" to your NuttX Project Directory
zig build-obj \
  --verbose-cimport \
  -target riscv32-freestanding-none \
  -mcpu=baseline_rv32-d \
  -isystem "$HOME/nuttx/nuttx/include" \
  -I "$HOME/nuttx/apps/include" \
  sensortest.zig
Note that target and mcpu are specific to BL602...
How did we get the Compiler Options -isystem and -I?
Remember that we'll link our Compiled Zig App into the NuttX Firmware.
Hence the Zig Compiler Options must be the same as the GCC Options used to compile NuttX.
(See the GCC Options for NuttX)
Next comes a quirk specific to BL602: We must patch the ELF Header from Software Floating-Point ABI to Hardware Floating-Point ABI...
##  Patch the ELF Header of `sensortest.o` from
##  Soft-Float ABI to Hard-Float ABI
xxd -c 1 sensortest.o \
  | sed 's/00000024: 01/00000024: 03/' \
  | xxd -r -c 1 - sensortest2.o
cp sensortest2.o sensortest.o
Finally we inject our Compiled Zig App into the NuttX Project Directory and link it into the NuttX Firmware...
##  Copy the compiled app to NuttX and overwrite `sensortest.o`
##  TODO: Change "$HOME/nuttx" to your NuttX Project Directory
cp sensortest.o $HOME/nuttx/apps/testing/sensortest/sensortest*.o

##  Build NuttX to link the Zig Object from `sensortest.o`
##  TODO: Change "$HOME/nuttx" to your NuttX Project Directory
cd $HOME/nuttx/nuttx
make

##  For WSL: Copy the NuttX Firmware to c:\blflash for flashing
mkdir /mnt/c/blflash
cp nuttx.bin /mnt/c/blflash
We're ready to run our Zig App!
Run Zig App
Follow these steps to flash and boot NuttX (with our Zig App inside) on BL602...
In the NuttX Shell, enter this command to start our Zig App...
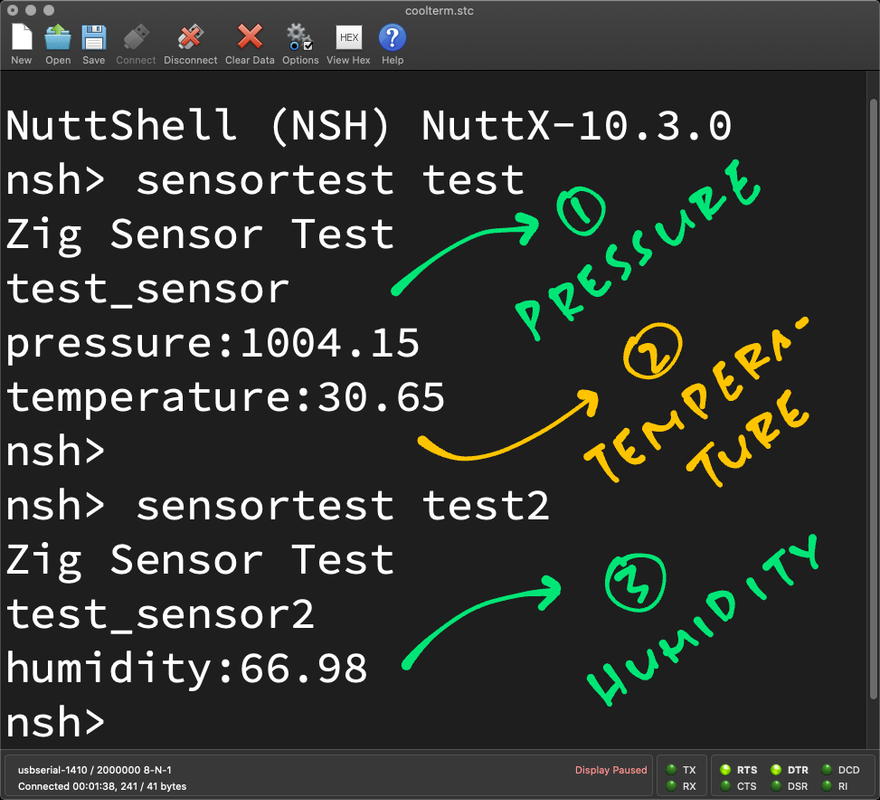
sensortest test
Which reads the Air Pressure and Temperature from the BME280 Barometer Sensor...
nsh> sensortest test
Zig Sensor Test
test_sensor
pressure:1007.66
temperature:27.70
This says that the Air Pressure is 1,007.66 millibars and the Temperature is 27.70 °C.
Then enter this...
sensortest test2
Which reads the Humidity from the BME280 Humidity Sensor...
nsh> sensortest test2
Zig Sensor Test
test_sensor2
humidity:78.81
This says that the Relative Humidity is 78.81 %.
Yep our Zig Sensor App reads the Air Pressure, Temperature and Humidity correctly from BME280 Sensor yay!
Multiple Sensors
To test a different sensor, do we rewrite the Zig Sensor App?
Is there an easier way to test any NuttX Sensor?
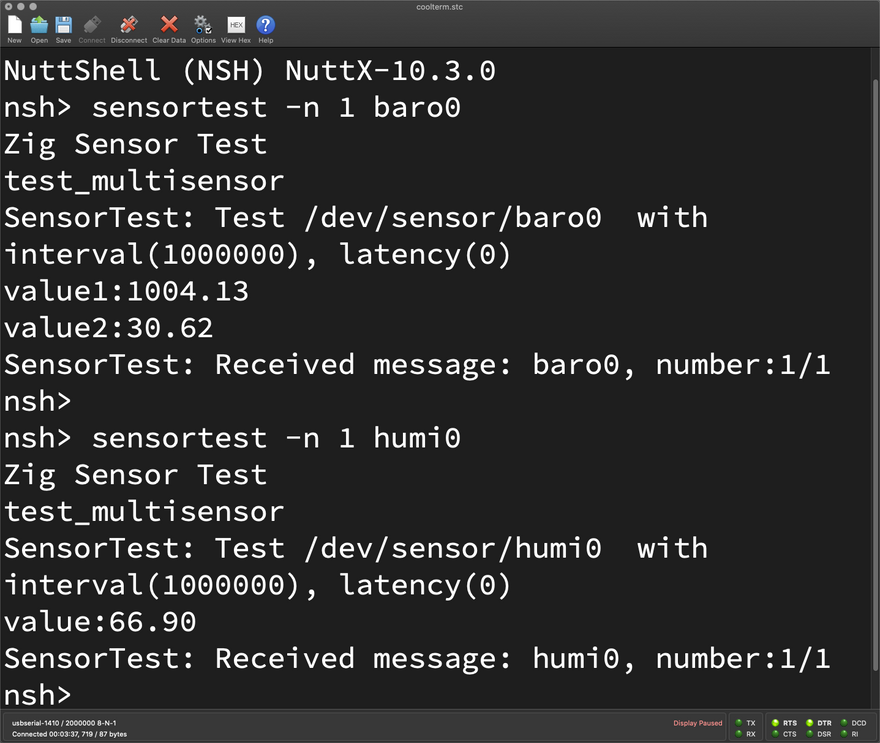
This is how we test any NuttX Sensor, without rewriting our app...
nsh> sensortest -n 1 baro0
Zig Sensor Test
test_multisensor
SensorTest: Test /dev/sensor/baro0  with interval(1000000), latency(0)
value1:1007.65
value2:27.68
SensorTest: Received message: baro0, number:1/1
Just specify the name of the Sensor Device ("baro0") as the Command-Line Argument.
("-n 1" means read the Sensor Data once)
And this is how we read "humi0"...
nsh> sensortest -n 1 humi0
Zig Sensor Test
test_multisensor
SensorTest: Test /dev/sensor/humi0  with interval(1000000), latency(0)
value:78.91
SensorTest: Received message: humi0, number:1/1
From the above output we see that Air Pressure is 1,007.65 millibars, Temperature is 27.68 °C and Relative Humidity is 78.91 %.
(See the Command-Line Arguments)
Which sensors are supported?
Here's the list of Sensor Devices supported by the app...
To understand the printed values (like "value1" and "value2"), we refer to the Sensor Data Structs...
How does it work?
Inside our Zig Sensor App is a Multi-Sensor Module that handles all kinds of sensors...
The Zig code was converted from the NuttX Sensor Test App in C...
Which is explained here...
Below are the steps for converting the Sensor Test App from C to Zig...
Pine64 PineDio Stack BL604 RISC-V Board (left) talking LoRaWAN on Zig to RAKwireless WisGate LoRaWAN Gateway (right)
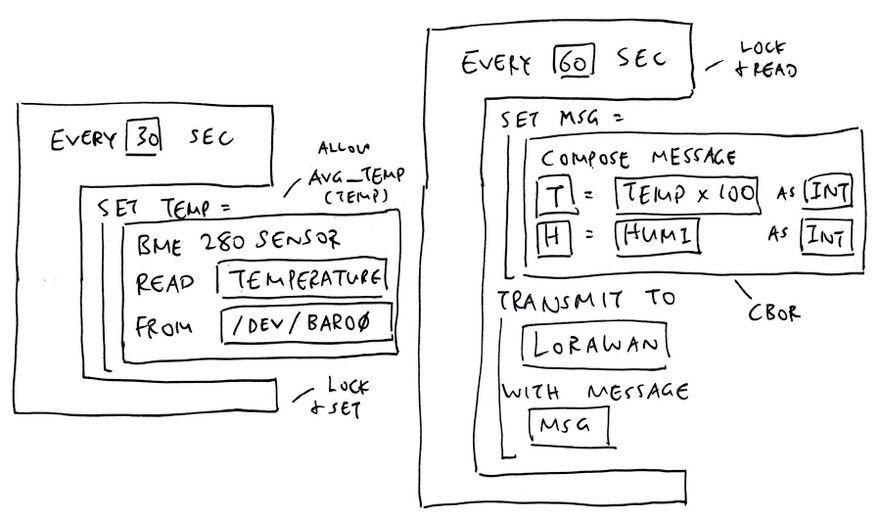
LoRaWAN and Visual Programming
Once again... Why are we doing this in Zig?
We said earlier that Zig is super helpful for writing safer programs because it catches problems at runtime: Overflow, Underflow, Array Out-of-Bounds and more. (See the list)
And we plan to use the Zig code in this article for upcoming LoRaWAN and Visual Programming projects.
Isn't LoRaWAN the long-range, low-power, low-bandwidth Wireless Network for IoT Gadgets?
Yep we have previously created a Zig app for the LoRaWAN Wireless Network...
Now we can integrate the Sensor Code from this article... To create the firmware for an IoT Gadget that actually transmits real Sensor Data!
We'll compress the Sensor Data with CBOR...
And monitor the Sensor Data with Prometheus and Grafana...
And this LoRaWAN App will work for all kinds of NuttX Sensors?
Righto our Zig LoRaWAN App will eventually support all types of NuttX Sensors.
But we've seen today that each kind of NuttX Sensor needs a lot of boilerplate code (and error handling) to support every sensor.
Can we auto-generate the boilerplate code for each NuttX Sensor?
I'm about to experiment with Visual Programming for NuttX Sensors.
Perhaps we can drag-n-drop a NuttX Sensor into our LoRaWAN App...
And auto-generate the Zig code for the NuttX Sensor! (Pic below)
That would be an awesome way to mix-n-match various NuttX Sensors for IoT Gadgets!
What's Next
I hope you find this article helpful for creating your own Sensor App. Lemme know what you're building!
In the coming weeks I shall customise Blockly to auto-generate the Zig Sensor App. Someday we'll create Sensor Apps the drag-n-drop way!
To learn more about Zig, check out these tips...
See my earlier work on Zig, NuttX, LoRaWAN and LVGL...
Many Thanks to my GitHub Sponsors for supporting my work! This article wouldn't have been possible without your support.
Got a question, comment or suggestion? Create an Issue or submit a Pull Request here...
lupyuen.github.io/src/sensor.md
Notes
This article is the expanded version of this Twitter Thread
-
The design of the NuttX Sensor API is discussed here...
-
Our Zig App includes a Custom Logger and Panic Handler. They are explained below...
Appendix: Fixed-Point Sensor Data
How do we use Fixed-Point Numbers for Sensor Data?
Our Zig Sensor App reads Sensor Data as Floating-Point Numbers...
And converts the Sensor Data to Fixed-Point Numbers (2 decimal places) for printing...
// Convert Pressure to a Fixed-Point Number
const pressure = float_to_fixed(
  sensor_data.pressure
);

// Print the Pressure as a Fixed-Point Number
debug("pressure:{}.{:0>2}", .{
  pressure.int,
  pressure.frac
});
(More about float_to_fixed in a while)
(Someday we might simplify the printing with Custom Formatting)
UPDATE: We no longer need to call floatToFixed when printing only one Floating-Point Number. The Debug Logger auto-converts it to Fixed-Point for us. (See this)
What are "int" and "frac"?
Our Fixed-Point Number has two Integer components...
int: The Integer part
frac: The Fraction part, scaled by 100
So to represent 123.456, we break it down as...
int =
123frac =
45
We drop the final digit 6 when we convert to Fixed-Point.
Why handle Sensor Data as Fixed-Point Numbers? Why not Floating-Point?
When we tried printing the Sensor Data as Floating-Point Numbers, we hit some Linking and Runtime Issues...
Computations on Floating-Point Numbers are OK, only printing is affected. So we print the numbers as Fixed-Point instead.
(We observed these issues with Zig Compiler version 0.10.0, they might have been fixed in later versions of the compiler)
Won't our Sensor Data get less precise in Fixed-Point?
Yep we lose some precision with Fixed-Point Numbers. (Like the final digit 6 from earlier)
But most IoT Gadgets will truncate Sensor Data before transmission anyway.
And for some data formats (like CBOR), we need fewer bytes to transmit Fixed-Point Numbers instead of Floating-Point...
Thus we'll probably stick to Fixed-Point Numbers for our upcoming IoT projects.
How do we convert Floating-Point to Fixed-Point?
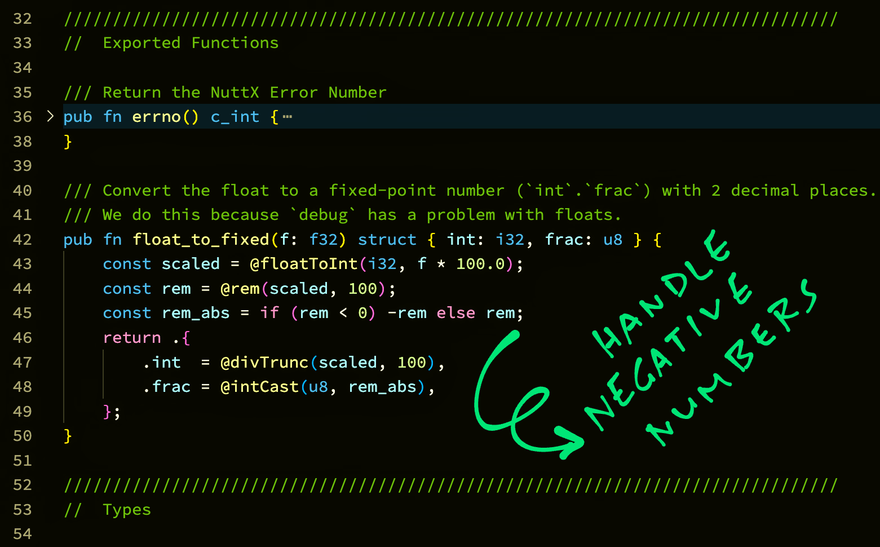
Below is the implementation of float_to_fixed, which receives a Floating-Point Number and returns the Fixed-Point Number (as a Struct): sensor.zig
/// Convert the float to a fixed-point number (`int`.`frac`) with 2 decimal places.
/// We do this because `debug` has a problem with floats.
pub fn float_to_fixed(f: f32) struct { int: i32, frac: u8 } {
  const scaled = @floatToInt(i32, f * 100.0);
  const rem = @rem(scaled, 100);
  const rem_abs = if (rem < 0) -rem else rem;
  return .{
    .int  = @divTrunc(scaled, 100),
    .frac = @intCast(u8, rem_abs),
  };
}
(See the docs: @floatToInt, @rem, @divTrunc, @intCast)
This code has been tested for positive and negative numbers.


Top comments (2)
good job, very detailed explanation.
Thanks! :-)