A Problem in the Closet
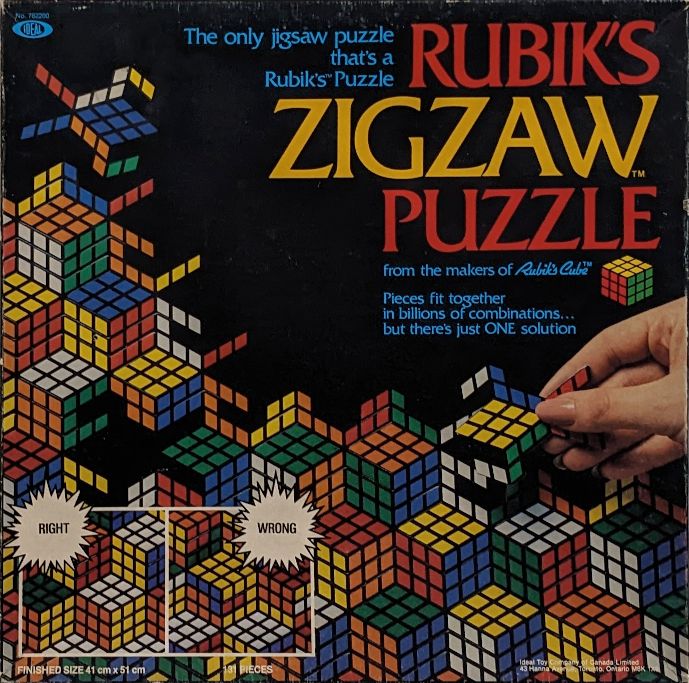
Some time ago, during a period of Rubik's Cube induced madness, I purchased from a reseller what I thought to be a normal Rubik's Cube themed jigsaw puzzle. However, upon receiving the puzzle I quickly realized I got something else entirely, a Zigzaw!
In this walk-through I'll be using Zig to defeat a troublesome Rubik's Zigzaw Puzzle that has been tucked away in my closet for many years.
Note: I'm using Zig 0.10.0 for this article.
What is the Zigzaw?
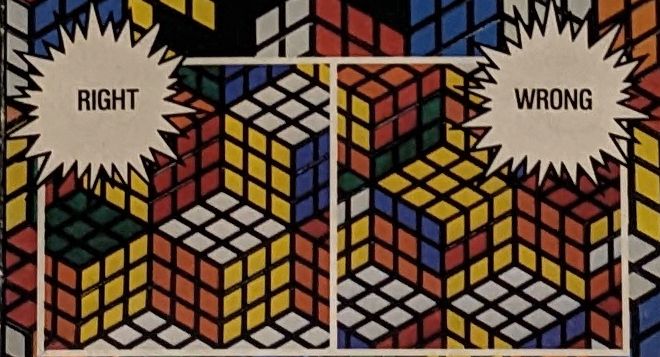
The Zigzaw Puzzle is a Rubik's Cube themed jigsaw puzzle that was released in 1982. Unlike a normal jigsaw, there is no picture on the box of what the completed puzzle should look like. Your only hint is a small visual guide that your completed puzzle should look like an isometric projection of a bunch of completed Rubik's Cubes. (This is also called Rhombille Tiling).
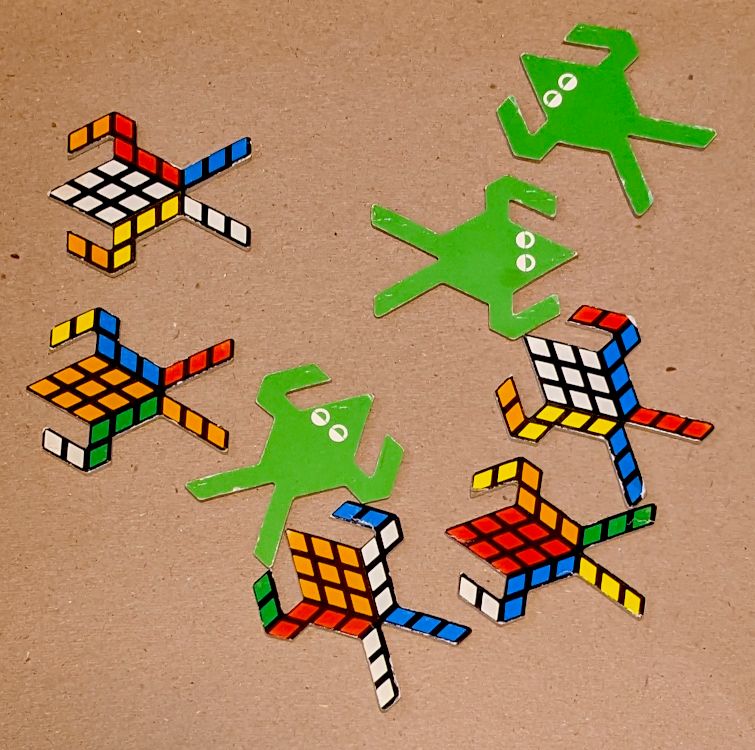
The puzzle only contains 131 pieces: 50 border and 81 inner pieces. Another difference between the Zigzaw and a normal puzzle is that all the inner pieces are all exactly the same shape. Each of these inner pieces is shaped like a frog. Printed on the top are parts of a Rubik Cube and on the back there is a cute little frog design to taunt you.
The Puzzle's Border
Assembling the border is fairly straightforward as many of the pieces are uniquely shaped and it is obvious which pieces go together based on their colouring.
The Interior
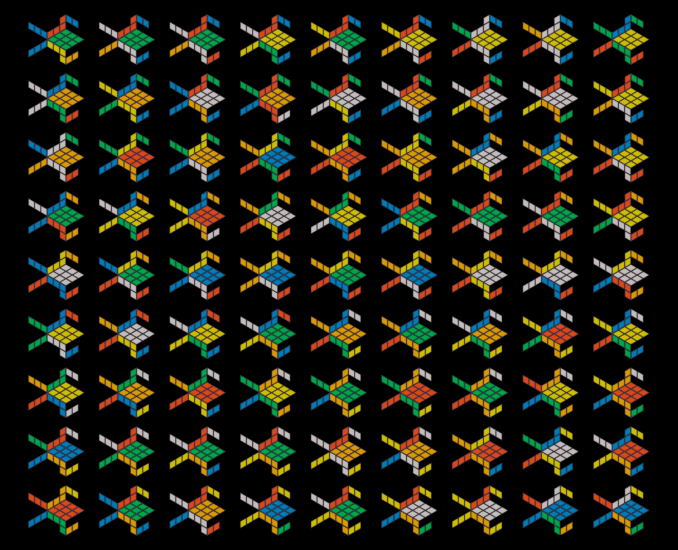
This is where the challenge begins! There are 81 unique inner pieces that combine together to form a Rubik pattern.
Frog Anatomy
In order to talk about how the pieces (frogs) fit together, it helps to describe their anatomy.
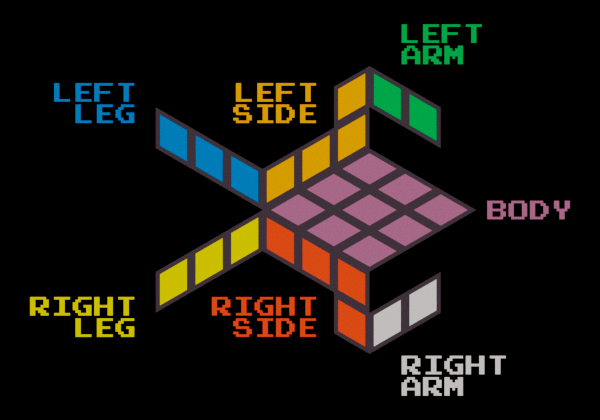
While the frog's body represents one face of a Rubik's cube, the other faces are composed of three different frog pieces. Here is how the frogs fit together.

The center frog's white left arm fits with the upper right frog's white right side, and the right frog's white left leg. Confusing?
Some Assembly Required
As you start combining pieces with the border, you'll realize that multiple pieces can match to form a valid Rubik cube pattern.
As an example of this, if you look at the upper left corner of the puzzle, the piece that needs to be placed needs to match the following requirements:
- Blue Left Arm
- Red Left Side
- Yellow Left Leg
- Orange Right Leg
There are two different frogs which meet these requirements. (They are in the top row of the inner piece layout image above.)
To proceed you have to pick one and hope you chose wisely. It is entirely possible that by the time you've placed over half the pieces you can run into a situation where there are no pieces left that fit with the neighbours. Meaning at some point when you had multiple options to pick from, you chose poorly.
I'm sure solving the physical puzzle could be fun (and some friends have completed it in an afternoon). But I was too disorganized to solve it decided programming a solution would be even more fun! Besides who has the time and the table space available to try out all 5797126020747367985879734231578109105412357244731625958745865049716390179693892056256184534249745940480000000000000000000 possible piece positions [1]?
Zig to the Rescue
With the details of how the puzzle works out of the way, now we can jump to Zig and work out an algorithm to solve the Zigzaw. Because I want to watch the program toil away while I sit on my chair, I'll be using raylib to provide visual feedback during the solve.
Why raylib?
"Raylib is a very easy to use library for implementing basic video games." In just about 50 lines of code (including the build.zig) we can get an OpenGL window with our Zigzaw border. Also, the faster it is for me to see something visually interesting, the easier it is to stay motivated about it. Even if I end up replacing that initial work, just having something early to look at is invaluable to me.
A Beginning
Just to show off how easy it is to get something running, here is the build.zig and main.zig that renders out the puzzle border.
build.zig
const std = @import("std");
const raylib_build = @import("ext/raylib/src/build.zig");

pub fn build(b: *std.build.Builder) void {
    const target = b.standardTargetOptions(.{});
    const mode = b.standardReleaseOptions();

    const raylib = raylib_build.addRaylib(b, target);
    raylib.setBuildMode(mode);

    const exe = b.addExecutable("zigzaw", "src/main.zig");
    exe.linkLibrary(raylib);
    exe.setTarget(target);
    exe.setBuildMode(mode);

    exe.addIncludePath("ext/raylib/src");
    exe.linkLibC();
    exe.install();

    const run_cmd = exe.run();
    run_cmd.step.dependOn(b.getInstallStep());
    if (b.args) |args| {
        run_cmd.addArgs(args);
    }
    const run_step = b.step("run", "Run the app");
    run_step.dependOn(&run_cmd.step);
}
The build.zig is a slightly modified version of the standard one generated by zig init-exe. The only changes are adding a few extra lines to include raylib's own bundled build.zig and making sure we link it against our main.zig.
main.zig
const std = @import("std");

const ray = @cImport(
    @cInclude("raylib.h"),
);

pub fn main() !void {
    ray.SetTraceLogLevel(4);

    const border_img = ray.LoadImage("imgs/border.gif");

    ray.InitWindow(border_img.width, border_img.height, "zigzaw");
    ray.SetWindowState(ray.FLAG_WINDOW_ALWAYS_RUN);

    const border_tex = ray.LoadTextureFromImage(border_img);
    defer ray.UnloadTexture(border_tex);
    ray.UnloadImage(border_img);

    ray.SetTargetFPS(60);

    while (!ray.WindowShouldClose()) {
        ray.BeginDrawing();
        ray.ClearBackground(.{ .r = 64, .g = 50, .b = 59, .a = 255 });
        ray.DrawTexture(border_tex, 0, 0, ray.WHITE);
        ray.EndDrawing();
    }
}
If we zig build run the above we get
Frog Geometry
Before we can position our frogs on the board, we need to define some constants. This is important since we need to know the pixel offsets required to move our textures around. We'll also be sampling the textures for their colour values because I was too lazy to type all the colours in by hand[2]. What this means is we need to know the board dimensions, the frog sizes relative to the board, and the proportions of the divisions within the frogs themselves.
Instead of working with dimensions of the frog sizes relative to the board directly, I instead opted to use hexagons. This wasn't a necessity, but I had originally started with hexagons when building the visualization and stuck with it.
For an amazing distraction on hexagon tiles I highly recommend reading Red Blob Game's Hexagonal Grids
On to the constants -
// Various measurements and dimensions

// The ratio of a hex with the pointy side pointing up is
// sqrt(3) : 2  (x : y)
// But we'll normalize our x coordinate so we'll be working with the following -
// Width & height of a hex
const hex_width = 1.0;
const hex_height = 2.0 / @sqrt(3.0);

// Distance to the hex one column over is 1 hex.
const hex_col_width = hex_width;
// Distance to the next hex row is 3/4th a hex
const hex_row_height = hex_height * 3.0 / 4.0;

// Every other row has an offset of half the hex_width
const hex_row_col_offset = hex_width / 2.0;

// The board doesn't end nicely on the edge of a hex.
// So we need to define the size of the frog relative to a hex.
// Using the Rubik lines on the frog we can see that a hex contains 6 Rubik divisions
const frog_divs_x = 9.0;
const frog_divs_y = 7.0;
const frog_hex_divs = 6.0;
const frog_hex_div_width = hex_width / frog_hex_divs;
const frog_hex_div_height = hex_height / frog_hex_divs;
const frog_hex_width = frog_hex_div_width * frog_divs_x;
const frog_hex_height = frog_hex_div_height * frog_divs_y;

// On the board this is how many frogs are defined, including the borders.
const frogs_per_row = 11;
const frogs_per_col = 11;

// The board dimensions in hexs is
const board_hex_width = 11.0 * hex_width;

// The board doesn't align perfectly with the hexs vertically // But the board does align on the frog division line.
// The board is 10 units plus two frog hex divisions
const board_hex_offset = frog_hex_div_height * 2.0;
const board_hex_height = 10.0 * hex_row_height + board_hex_offset;

// Frog UV coordinates within "frog space" is from the frog's feet to nose in the x-axis
// and from the outer edges of the frog's arms.
// We'll use the frog_divs as a ruler to pick the center of the Rubik side.
const body_uv = ray.Vector2{ .x = 6.0 / frog_divs_x, .y = 0.5 };
const left_arm_uv = ray.Vector2{ .x = 6.5 / frog_divs_x, .y = 0.75 / frog_divs_y };
const left_side_uv = ray.Vector2{ .x = 5.5 / frog_divs_x, .y = 0.75 / frog_divs_y };
const left_leg_uv = ray.Vector2{ .x = 0.5 / frog_divs_x, .y = 1.75 / frog_divs_y };
const right_arm_uv = ray.Vector2{ .x = left_arm_uv.x, .y = 1.0 - left_arm_uv.y };
const right_side_uv = ray.Vector2{ .x = left_side_uv.x, .y = 1.0 - left_side_uv.y };
const right_leg_uv = ray.Vector2{ .x = left_leg_uv.x, .y = 1.0 - left_leg_uv.y };
Providing Structure
With our rulers defined we can now start defining our enums and structs.
const NamedColor = enum {
    red,
    orange,
    yellow,
    blue,
    green,
    white,
    unknown,
};

const HexCoord = enum {
    right,
    upper_right,
    upper_left,
    left,
    lower_left,
    lower_right,
    middle,
};

pub const Frog = struct {
    left_arm: NamedColor = .unknown,
    left_side: NamedColor = .unknown,
    left_leg: NamedColor = .unknown,
    right_leg: NamedColor = .unknown,
    right_side: NamedColor = .unknown,
    right_arm: NamedColor = .unknown,
    body: NamedColor = .unknown,

    // a's side fits with b
    pub fn fits(a: Frog, fit: HexCoord, b: Frog) bool {
        return switch (fit) {
            .right => a.left_arm == b.left_leg and a.right_arm == b.right_leg,
            .left => a.left_leg == b.left_arm and a.right_leg == b.right_arm,
            .upper_right => a.left_arm == b.right_side and a.left_side == b.right_leg,
            .upper_left => a.left_leg == b.right_side and a.left_side == b.right_arm,
            .lower_left => a.right_leg == b.left_side and a.right_side == b.left_arm,
            .lower_right => a.right_arm == b.left_side and a.right_side == b.left_leg,
            else => false,
        };
    }
};

const TexturedFrog = struct {
    frog: Frog,
    tex: ray.Texture,
    free: bool,
};
The enums are pretty self-explanatory. The Frog struct is the most important as it represents a piece in the puzzle. There is a NamedColor field for each part of the frog which defines the colour of that part. The key bit is the fn fits(a: Frog, fit: HexCoord, b: Frog) bool function. We compare a Frog (self) with another Frog using a HexCoord. The HexCoord provides the different orientations in which the frogs fit together. In English this becomes, does my Frog A's upper_right HexCoord fit with Frog B.
Adding Some Frogs
Each of the 81 inner frogs is stored as an individual .gif file on disk. As part of our start-up we need to first load these .gifs and store them as raylib Textures.
var tex_frogs: [81]TexturedFrog = undefined;
var str_buf: [64:0]u8 = undefined;

for (tex_frogs) |*tex_frog, i| {
        const img_name = try std.fmt.bufPrintZ(str_buf[0..], "imgs/piece.{}.gif", .{i});
        const frog_img = ray.LoadImage(img_name.ptr);
        defer ray.UnloadImage(frog_img);

        tex_frog.* = .{
                .frog = try createFrog(frog_img),
                .tex = ray.LoadTextureFromImage(frog_img),
                .free = true,
        };
}
To create a Frog we sample the colours from the images we loaded in. This is where our frog UVs we defined earlier become useful.
fn createFrog(img: ray.Image) !Frog {
    var frog = Frog{};

    frog.left_arm = try sampleFrogColor(img, left_arm_uv);
    frog.left_side = try sampleFrogColor(img, left_side_uv);
    frog.left_leg = try sampleFrogColor(img, left_leg_uv);
    frog.right_leg = try sampleFrogColor(img, right_leg_uv);
    frog.right_side = try sampleFrogColor(img, right_side_uv);
    frog.right_arm = try sampleFrogColor(img, right_arm_uv);
    frog.body = try sampleFrogColor(img, body_uv);

    return frog;
}

fn sampleFrogColor(img: ray.Image, coord: ray.Vector2) !NamedColor {
    if (coord.x < 0.0 or coord.x >= 1.0 or coord.y < 0.0 or coord.y >= 1.0)
        return error.OutOfBounds;
    const color = ray.GetImageColor(
        img,
        to_pixel_coord(coord.x, img.width),
        to_pixel_coord(coord.y, img.height),
    );
    return guessColor(color);
}

fn guessColor(color: ray.Color) !NamedColor {
    if (color.r > 128 and color.g > 128 and color.b > 128) return .white;
    if (color.r > 190 and color.g > 170 and color.b < 5) return .yellow;
    if (color.r > 190 and color.g > 128 and color.b < 5) return .orange;
    if (color.r > 190 and color.g > 0 and color.b < 30) return .red;
    if (color.r < 5 and color.g > 128 and color.b > 30) return .green;
    if (color.r < 5 and color.g > 30 and color.b > 128) return .blue;
    return error.UnknownColor;
}
Zig's error handling is helpful here. If there is an unexpected colour the function can return an UnknownColor error. In some cases this is a problem and should halt the program; in other cases this is acceptable and will be handled appropriately.
Adding The Border
Now there is an array of all the inner pieces, but we still need border pieces to check fittings against. Following a similar procedure as with the individual pieces, we can sample the full border.gif. We do this by marching along the top and bottom edges as well as the two sides creating Frog structs as we go.
/// Transform a UV coordinate by scaling and offsetting.
fn offset_scale_uv(frog_uv: ray.Vector2, offset: ray.Vector2, scale: ray.Vector2) ray.Vector2 {
    const uv = ray.Vector2{
        .x = (frog_uv.x * frog_hex_width + offset.x) * scale.x,
        .y = (frog_uv.y * frog_hex_height + offset.y) * scale.y,
    };
    return uv;
}

/// Given a image of the border and a frog row and column
/// sample the image and generate a new Frog.
fn createBorderFrog(img: ray.Image, row: usize, col: usize) Frog {
    var frog = Frog{};

    const scale = ray.Vector2{ .x = 1.0 / board_hex_width, .y = 1.0 / board_hex_height };
    var offset = ray.Vector2{ .x = 0.0, .y = 0.0 };

    // We convert each row / col to "frog space" where the upper left corner is 0,0
    offset.x = hex_col_width * @intToFloat(f32, col) - 0.5 * @intToFloat(f32, @mod(row, 2));
    offset.y = hex_row_height * @intToFloat(f32, row) - frog_hex_div_height * 2.5;

    frog.left_arm = sampleFrogColor(img, offset_scale_uv(left_arm_uv, offset, scale)) catch .unknown;
    frog.left_side = sampleFrogColor(img, offset_scale_uv(left_side_uv, offset, scale)) catch .unknown;
    frog.left_leg = sampleFrogColor(img, offset_scale_uv(left_leg_uv, offset, scale)) catch .unknown;
    frog.right_leg = sampleFrogColor(img, offset_scale_uv(right_leg_uv, offset, scale)) catch .unknown;
    frog.right_side = sampleFrogColor(img, offset_scale_uv(right_side_uv, offset, scale)) catch .unknown;
    frog.right_arm = sampleFrogColor(img, offset_scale_uv(right_arm_uv, offset, scale)) catch .unknown;
    frog.body = sampleFrogColor(img, offset_scale_uv(body_uv, offset, scale)) catch .unknown;

    return frog;
}

/// Build our border by adding Frogs to a slice of constraints.
fn build_border(img: ray.Image, constraints: []Frog) void {
    // top row
    var i: usize = 0;
    var k: usize = 0;
    while (i < frogs_per_row) : ({
        i += 1;
        k += 1;
    }) {
        constraints[i] = createBorderFrog(img, 0, k);
    }

    // left side
    i = frogs_per_row;
    k = 1;
    while (i < (frogs_per_col - 1) * frogs_per_row) : ({
        i += frogs_per_row;
        k += 1;
    }) {
        constraints[i] = createBorderFrog(img, k, 0);
    }

    // snipped right and bottom for brevity.
}
Now that we have the inner pieces and the border pieces defined, we can finally move on to the solver.
Writing the Solver
The algorithm for solving the puzzle is actually quite straightforward, the good old Backtracking Algorithm.
I love recursion and any solution that even hints at a recursion I'll jump at. BUT! In an attempt to use other approaches, respect the stack space and not break other people's brains, I forced myself to use a stack-based approach instead of recursion. Same result, less stack frames.
The Stack, The Constraints and The Textures
We have three arrays that we'll be dealing with.
tex_frogs: [81]TexturedFrogs, these are the 81 pieces which we don't know where to place. The TexturedFrog struct contains fields for the Frog (its colors), the handle to the raylib Texture on the GPU, and whether its been used or not.
constraints: [11*11]Frogs, this is our board. At the start of the program we filled in some of these with our border Frog values. As the solver runs it will be updating this array with new constraints (Frogs) as we go. (As I'm writing this, I'm not sure why I didn't make these pointers.)
stack: [81]?u8{null}, the final array is our current state of the solution. While the constraints array holds our current placement of pieces, the stack keeps track of what has been tried so far. Each entry in the array contains our current "guesswork". The value is either an u8 which is an offset into which of the 81 pieces we've already checked. Or the value can be null meaning we haven't checked that position at all yet.
var stack = [_]?u8{null} ** 81;
var stack_pos: usize = 0;

while (!ray.WindowShouldClose()) {
    ray.BeginDrawing();
    ray.ClearBackground(.{ .r = 64, .g = 50, .b = 59, .a = 255 });
    ray.DrawTexture(border_tex, 0, 0, ray.WHITE);
    {
        for (stack) |stack_v, i| {
            const frog_idx = stack_v orelse continue;
            const xf = @intToFloat(f32, @mod(i, 9));
            const y = i / 9;
            const yf = @intToFloat(f32, y);
            const col_offset = hex_row_col_offset * @intToFloat(f32, @mod(y, 2));
            ray.DrawTextureV(
                tex_frogs[frog_idx].tex,
                .{
                    .x = to_img_coord_x * (hex_row_col_offset + xf + col_offset),
                    .y = to_img_coord_y * (board_hex_offset + (yf * hex_row_height)),
                },
                ray.WHITE,
            );
        }
    }

    ray.EndDrawing();

    if (stack_pos < 81) {
       stack_pos = solve(&constraints, &tex_frogs, &stack, stack_pos);
    }
}
For the solve step itself we keep track of which position in the stack array we are with stack_pos. As long as our position is less than 81, (the number of pieces to place), we know we haven't solved for all the pieces yet. For the pieces we have solved, we draw the Texture to the board after figuring out their proper pixel offset.
Solving
Our (non-recursive) function takes the state of our current constraint array, the array of our textured frogs and most importantly our current state of the solve in the stack array along with position in that array.
Roughly the backtracking algorithm we use does the following -
- Pick an available
TexturedFrogand mark its position to thestackarray. - Check to see if it fits the constraint requirements. Does the
TexturedFrogfit with the neighbours? - If it fits, update our current position within the
stackarray. We also have to now tag thatTexturedFrogas being unavailable. Then move to the next position (pos+1) on the board. - If it didn't fit, keep looking through the available
TexturedFrogs. - If we hit the end of the
TexturedFrogarray and didn't find any frogs that fit, that means we have made a mistake at some point and we need to step back a position. - If we had to step back, instead of searching through all the available Frogs we start after the last one we previously tried in that position. We mark the previous
TexturedFrogas now being available and continue looking through the remaining available frogs. - Rinse and repeat.
fn solve(constraints: []Frog, frogs: []TexturedFrog, stack: []?u8, pos: usize) usize {
    const col = @mod(pos, 9);
    const row = pos / 9;
    const constraint_i = col + 1 + ((row + 1) * frogs_per_row);
    const c_offset = @mod(row, 2);

    var pick: u8 = 0;
    if (stack[pos] != null) {
        pick = stack[pos].?;
        frogs[pick].free = true;
        pick += 1;
    }

    while (pick < 81) : (pick += 1) {
        if (!frogs[pick].free) continue;
        const frog = frogs[pick].frog;

        if (!frog.fits(.upper_right, constraints[constraint_i - frogs_per_row + c_offset])) continue;
        if (!frog.fits(.upper_left, constraints[constraint_i - frogs_per_row - 1 + c_offset])) continue;
        if (!frog.fits(.left, constraints[constraint_i - 1])) continue;
        if (col == 8 and !frog.fits(.right, constraints[constraint_i + 1])) continue;

        stack[pos] = pick;
        frogs[pick].free = false;
        constraints[constraint_i] = frog;
        return pos + 1;
    }

    // Nothing found, backtrack
    constraints[constraint_i] = Frog{};
    stack[pos] = null;
    return pos - 1;
}
Remember why we used an OpenGL renderer to view this? Because it is easier to watch the solver run than it is to explain it!
Final Results
That's it! We're done!
You can play with the full thing here
As a potential follow-up article, we could generate the border and pieces ourselves from a JSON file instead of using the provided gif files in the repo. Or even better, we could generate and validate new puzzles of the same style!
Random Thoughts and Notes
-
Next time I reach for raylib, I've promised myself to try out
 ryupold
/
raylib.zig
ryupold
/
raylib.zig
Idiomatic Zig bindings for raylib utilizing raylib_parser
There are definitely improvements to be made on the algorithm. For example, there is no need to test all 81 pieces each time. We could pre-group the pieces that match the basic constraints so at most we'd only need to check against 5 or 6 pieces. Ultimately, the solver was already way faster than it needed to be for the game loop, so it didn't matter.
I've wondered if solving the Zigzaw would make for a good interview question or not.
[1] Factorial of 81 is the total possible positions. You'll notice that the box of the puzzle slightly underestimates this by saying "billions".
[2] This is actually a lie. I originally typed up a description of the full puzzle in JSON, which is what I used to generate the images used in the repo and above. But I wanted to demo and work with images instead of JSON. :)


Top comments (3)
Wow this is an amazing story, I think you take the crown for best story on Zig NEWS so far!
Thank you for sharing!
I agree. This was fantastic, and I didn't even know raylib actually supported Zig with a custom build script and all. This is amazing.
Without a doubt, an excellent article.
Thanks for sharing and inspiring us.