This is a post series dedicated to integrating Zig code into an iOS SwiftUI project. The goal here is not just to have Swift call into Zig code, but also to have a reasonably clean integration with the build process of our iOS application so that a single button press can build our app correctly and without doing any unnecessary work.
Why run Zig on iOS?
On iOS it's much easier to use Swift or ObjC than any other language, this is not a secret. The main reason one might want to run Zig on iOS is because you have Zig code that you can't (or don't want) to rewrite to Swift code. The best example of this are video games: when your app doesn't really have any native GUI element to it and it's just a 3D rendering canvas, then there's no point in trying to rewrite it for no gains and potentially worse performance.
In our case, we'll start with a much more humble example and work our way up.
The basics
Swift can't call Zig functions directly, but it can call functions that respect the C ABI and Zig can export functions (and types) that respect it. That's good to know, but it's not the full story because we also have to think about the compilation process.
Swift can refer to C symbol definitions put in a special header file and have those symbols be resolved at link time. This is nice because it means that we can have a separate build step that builds the Zig code into a static library, and then we just need to make sure that the linker knows about it.
That said, before we even open Xcode, we first need to make sure we know what to do on the Zig side of things.
Setting up a static lib Zig project
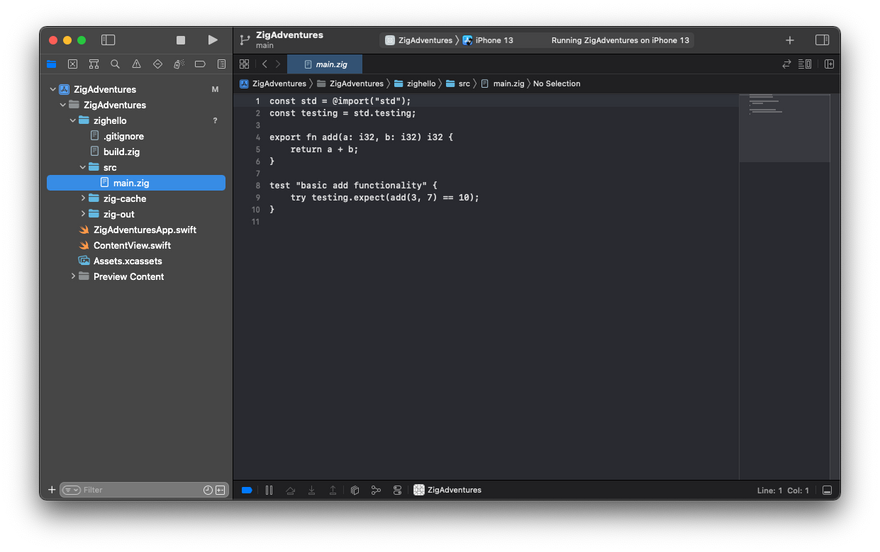
Zig has a handy template for creating a static library project. Create a new directory called zighello, enter it, and then run zig init-lib. If you did everything correctly, you should be able to call zig build test and see one test passing. This is also a good moment to take a look at the contents of src/main.zig to see what the placeholder code does.
$ cat src/main.zig
const std = @import("std");
const testing = std.testing;
export fn add(a: i32, b: i32) i32 {
    return a + b;
}
test "basic add functionality" {
    try testing.expect(add(3, 7) == 10);
}

$ zig build test
All 1 tests passed.
At this point you can call zig build to build the library. This will create zig-out/lib/libzighello.a. That's our static library, and as you can see from the source code, it exports a neat add function.
Adding CLI options for cross-compilation to build.zig
One last change that we need to make to our project is in build.zig. If you want to learn more in detail how to write Zig build scripts, take a look at this series by @xq.

In our case, it's just a couple of lines that you need to add:
const target = b.standardTargetOptions(.{});

// Put the next line before `lib.setBuildMode(mode);`
lib.setTarget(target);
These two lines add support for selecting a target from the command line when invoking the build. This is going to be important because later we'll need to cross-compile for an iOS device!
Git cleanup
This is optional but nice to do: add zig-cache and zig-out to a gitignore file, it will come in handy later!
$ echo "zig-out/\nzig-cache/" > .gitignore
Setting up the iOS app
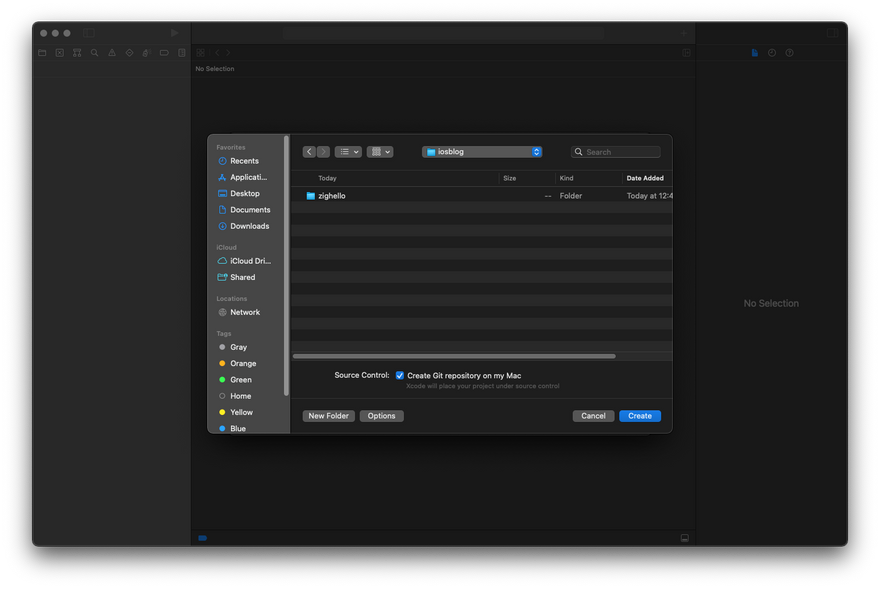
It's finally time to do the main part of the work. Create a new iOS project and select SwiftUI. Note that you can also use Zig from a normal Storyboard (or ObjC) app, I just happen to have chosen SwiftUI for this tutorial.
In this second menu you will need to provide a product name, and an organization identifier. Those are entirely up to you but they will influence the names of some variables later on so just be aware that ZigAdventures will be replaced by whatever you put in there.

If you don't have a personal team, no worries, you can proceed but you will need to create one later on. This is outside of the scope of this tutorial so refer to other learning materials to learn how to do it. I'll only point out that you don't need to pay the annual subscription to Apple if you just intend to run the app you build on an emulator.
On the final screen you will be asked if you want to create a Git repo. That's a good idea but first go into your Xcode settings to make sure you have your Git author info set, otherwise the process will fail.
At this point you should have an iOS project setup.
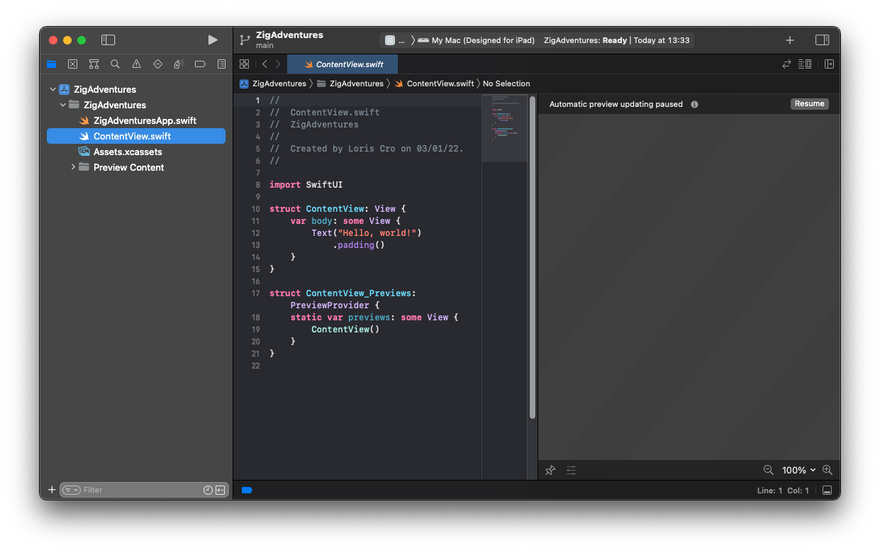
Before we try to run it, make sure that you change in the top bar the target to be an iOS emulator.

At this point you can press the play button and it should correctly build and start running on the emulator. If it doesn't, either you're missing the team credentials mentioned above, or something else went wrong in the setup process. Make sure to have a working basic app before continuing with this tutorial.
Integrating Zig into the build process
This is the fun part where we wire up Zig to Xcode and Swift, but it will require navigating through Xcode's menus, and that's actually the opposite of fun. Make sure you have enough time and patience before starting with this section.
Copy the zig code into your project
This part is easy, first you have to move the Zig project we created earlier into the same directory where your Swift code is. I've created the Xcode project right next to where I put zighello so in my case the command was the following:
$ mv zighello ZigAdventures/ZigAdventures/
Note that the repeated name is because of how Xcode structures the files. Also you might notice that doing so won't make the files show up in Xcode. For this to happen you have to right click over the ZigAdventures group (not the top-level project!) and select Add files to "ZigAdventures"...
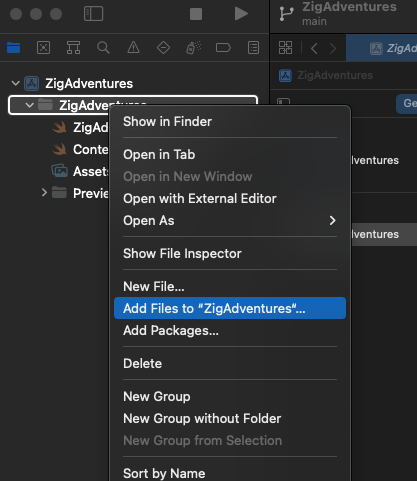
Now you should see zighello show up in Xcode under ZigAdventures.
Add a Zig build step
Now we need to make Xcode invoke zig build whenever we are building the project. Fortunately for us Xcode has explicit support for new build steps so we just need to find the right place in the endless sea of configuration options that Xcode exposes.
Select the ZigAdventures project (we previously selected the group, now we want its homonymous parent), then from the main screen select the Build Phases tab. You can take a look in there to see which steps are created by default.
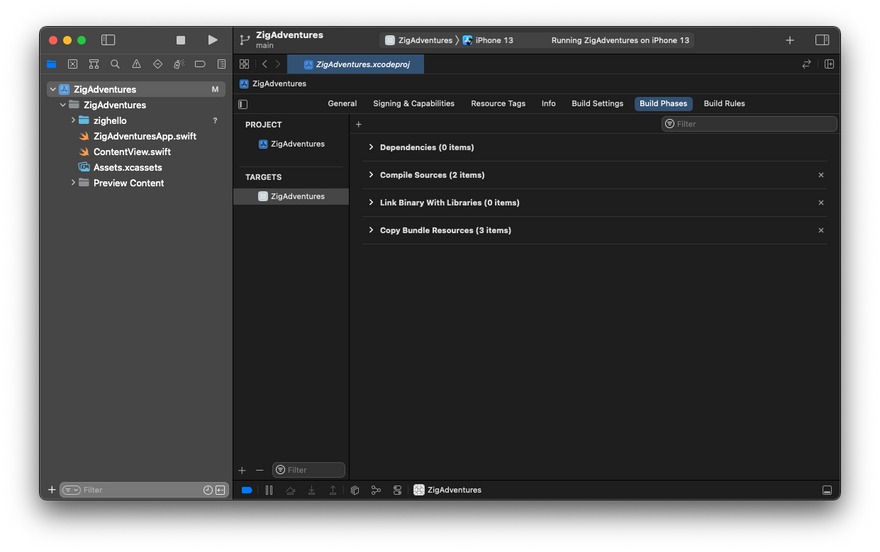
Press the tiny plus sign to create a new step and select New Run Script Phase. This will create it at the bottom of the list, so you need to drag it to the top (after Dependencies), since we need to compile the Zig libraries before we do the linking. Expand the newly created step and add the following lines to it:
cd "$PROJECT/zighello"
zig build -Dtarget=aarch64-ios
As you can see we are now passing to Zig build an option to target arm iOS.
Also make sure to deselect Based on dependency analysis. Xcode has a caching system to avoid useless work, but so does Zig (without requiring any setup on our part), so we can rely on it and disable the one from Xcode.

Now you can press the play button again to check if our project builds again. It should succeed but this is a good moment to observe a neat integration mechanism that we got for free: let's add a syntax error to the Zig file. I've added in src/main.zig a call to a function that doesn't exist and pressed the play button.
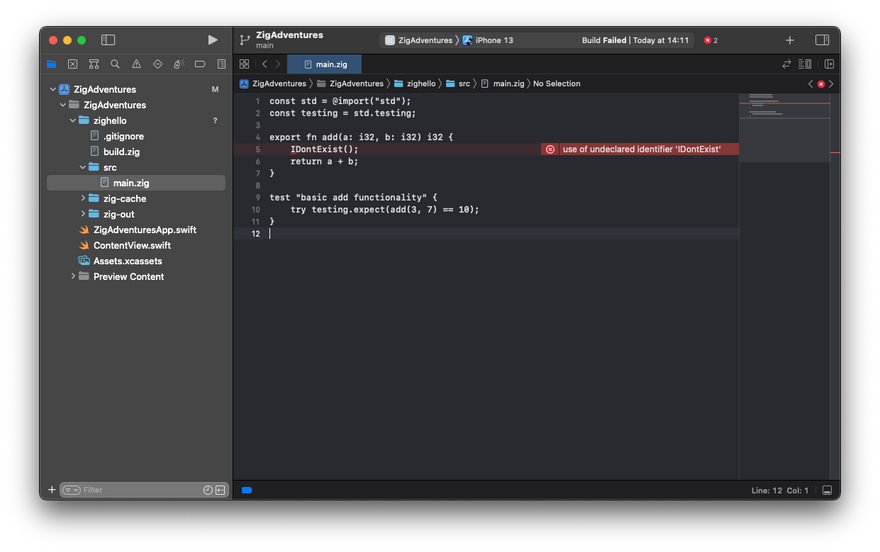
The result is that the Xcode build fails and that Xcode is able to point at the precise line where the error was, neat! Maybe not neat enough to prefer writing Zig code from Xcode rather than our main code editor, but it's a nice to have because it means that if we have an error inside our Zig project, Xcode will give us a reasonable hint of where the problem is, instead of failing without any explanation.
Make sure to fix the code we just broke before proceeding to the final step.
Call Zig from Swift
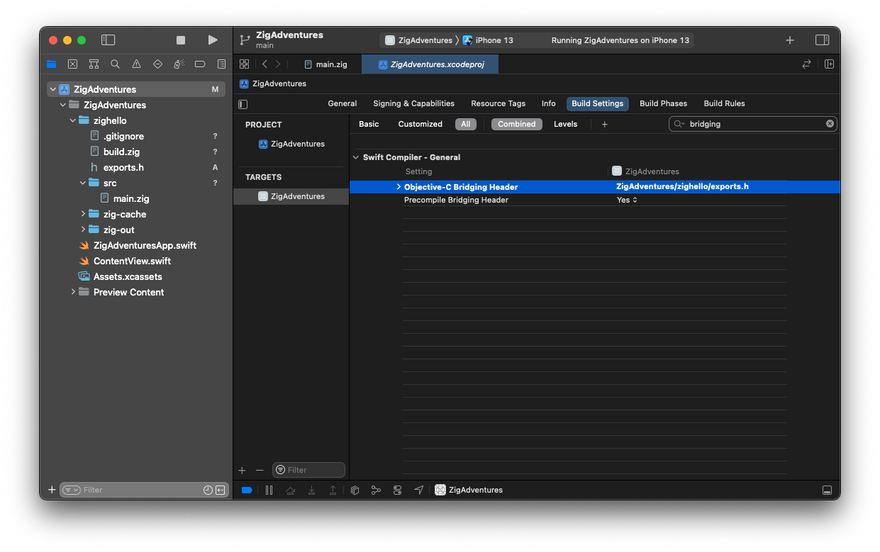
To call Zig from Swift, we first need to setup the C header file that will show to Swift which symbols we're going to provide from Zig at link time. Create a new file inside zighello named exports.h, then select the ZigAdventures project and from the main view select the Build Settings tab (it's right next to Build Phases from before). In there make sure that All is selected (next to Basic and Customized), then use the search box to the right and type bridging. At this point you should see a Objective-C Bridging Header list element. Double click on the empty space in the right side of the row and write $PROJECT/zighello/exports.h.
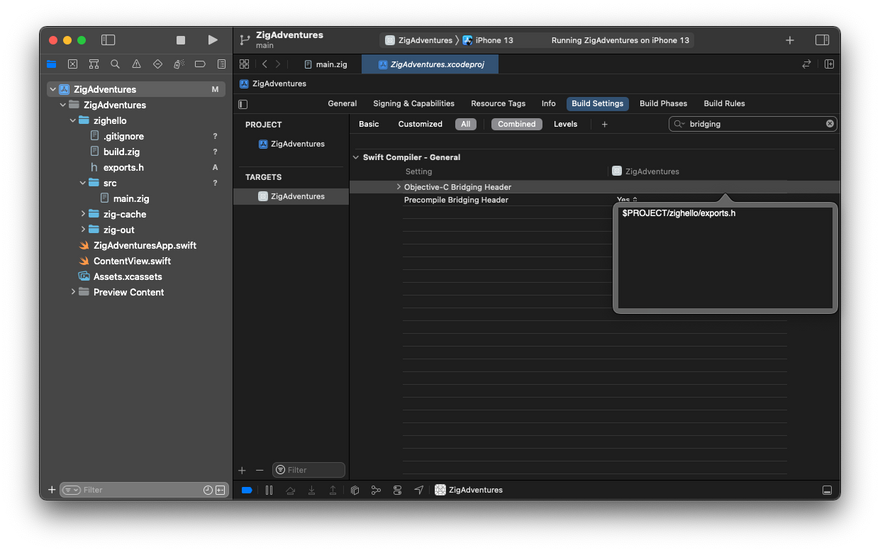
Once you press enter, the $PROJECT variable should have been replaced by the project name.
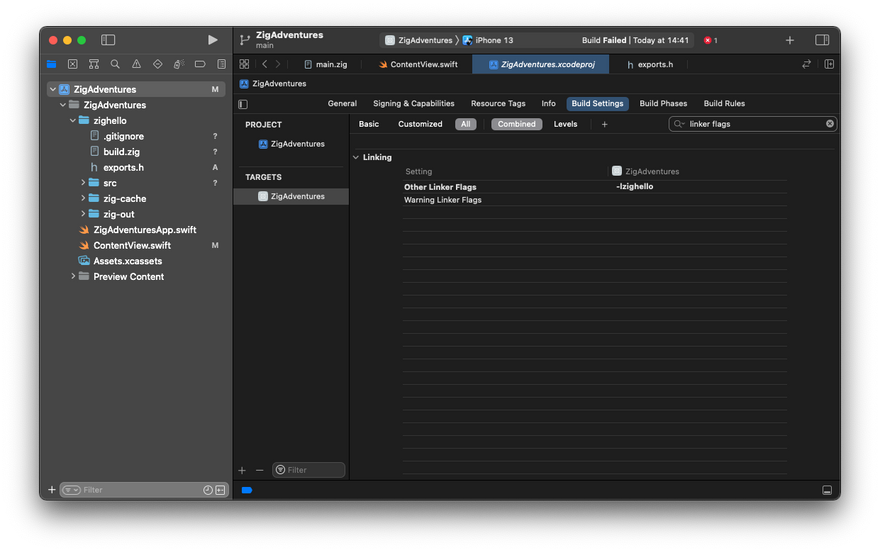
Now we need to tell the linker that we need to link against libzighello.a and where to find it.
In this same tab perform a new search for linker flags. On the Other Linker Flags row double click like before and add a -lzighello entry (that's a lowercase L).
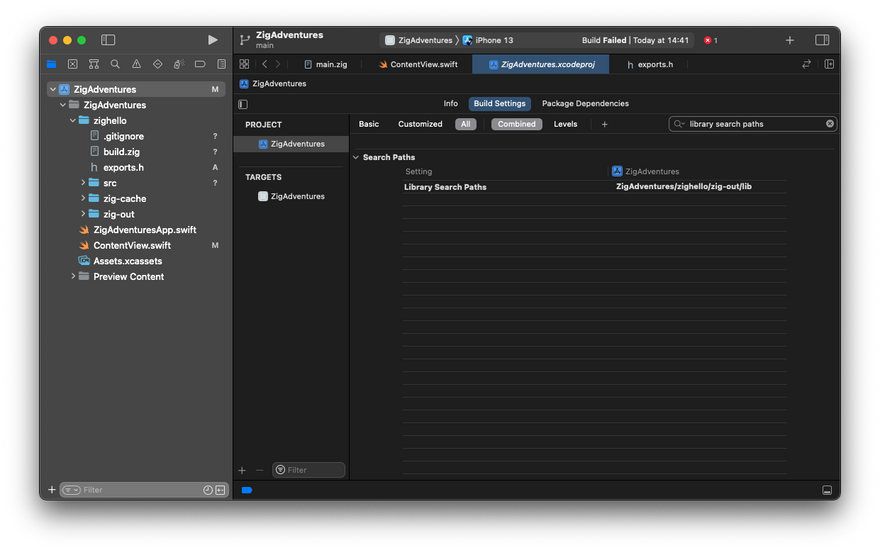
Next, search for library search paths and add $PROJECT/zighello/zig-out/lib to the corresponding line.
Final step
It's now time to add to exports.h the definition for our add function. Zig used to be able to produce these exports automatically for us, but the feature is disabled at the moment so we'll have to type it ourselves. Once the self-hosted compiler will be released (and the feature gets reimplemented), we won't have to do this step manually by ourselves anymore because Zig will produce a .h file alongside the .a one, meaning that we'll just have to #include the autogenerated file and call it a day. Until then, this is what you need to type in exports.h:
int add(int a, int b);
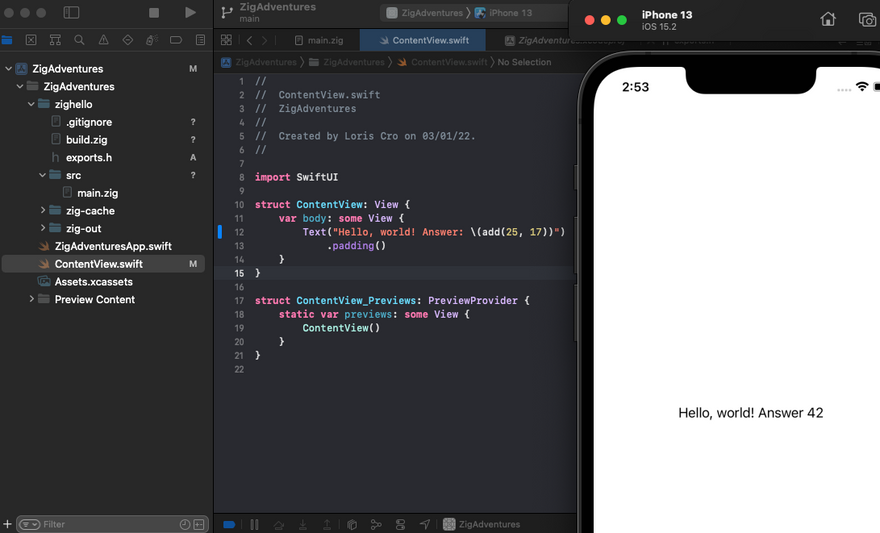
Save the file and then let's finally call Zig from Swift by editing ContentView.swift as follows:
import SwiftUI

struct ContentView: View {
    var body: some View {
    Text("Hello, world! Answer: \(add(25, 17))")
        .padding()
    }
}

struct ContentView_Previews: PreviewProvider {
    static var previews: some View {
        ContentView()
    }
}
Congratulations, we've successfully integrated Zig with an iOS Xcode project.
Conclusion and next steps
You can find the code I wrote today here:
 kristoff-it
/
ZigAdventures
kristoff-it
/
ZigAdventures
Zig Adventures on iOS
In the next post of this series I'll write more about how Zig and Swift handle C types. Swift in particular is going to be interesting since it's a garbage collected language (with reference counting, but I think it still qualifies).


Top comments (1)
If you're encountering failures when running zig build within Xcode build phase scripts, this is likely due to Xcode 15's new sandboxed environment for build scripts.
First the command
zigwill not be found because of how the sandboxed environment is handling the systems $PATH definitions. This can be solved by adding manuallyexport PATH=$PATH:/path/to/zigat the beginning of the Xcode Script. Usually the builds still fail with an "Unexpected" error from the zig building system. Im guessing that this is due to permission issues from the sandboxed environment. To avoid this u can disable the sandboxing setting in "Build settings" by changing the value of "User Scripting Sandboxing" to "No".